18 KiB
Orthographic
A utility to approximate satellite imagery of any location in the world. Aimed to be viable alternative for ortho photos in flight simulators, such as X-Plane or Microsoft Flight Simulator, with the main purpose to eliminate challenges with actual orthophotos. Written in Python.
While tools like Ortho4XP or AutoOrtho can provide next-level realism into X-Plane, the idea still falls short when it hits photos that were stitched together. In one or many ortho photos, you will see parts of the specific area of which the photo was not taken at the same time as another part, resulting in what is known as discoloration. Sometimes you will also find clouds in the photos, or remnants of buildings or attractions which show perspective distortion. This is a huge immersion-breaker for me and many others. A problem I wanted to tackle for my flight simulator - Orthographic may just be the solution that does away with all issues when it comes to ortho photos in flight simulators.
Currently, zoom level 16 and 18 are implemented.
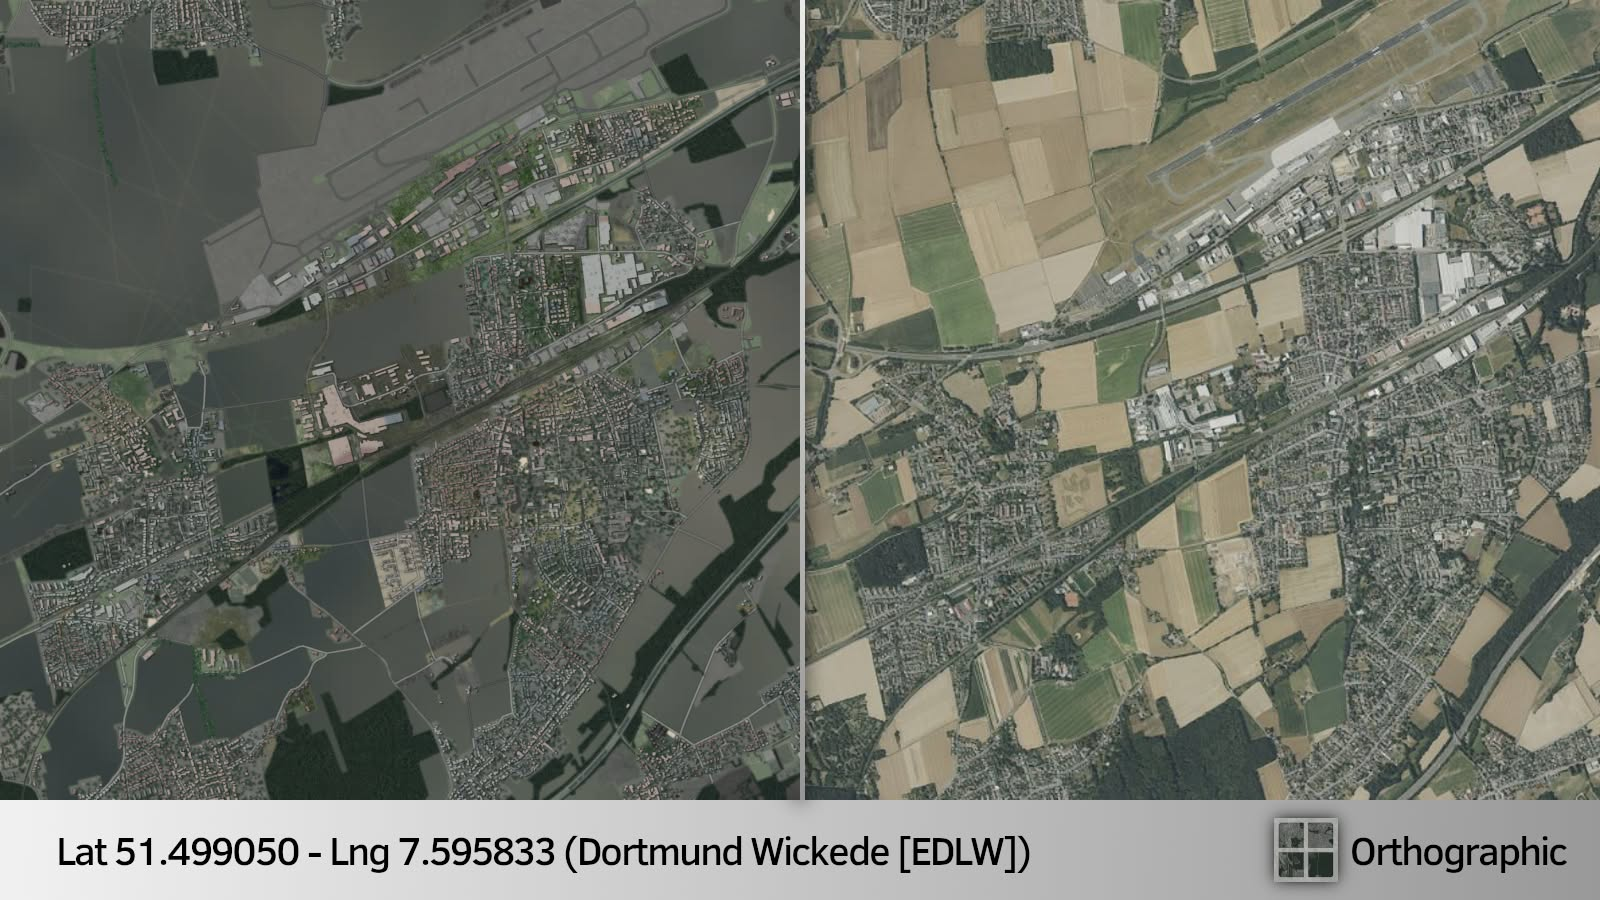
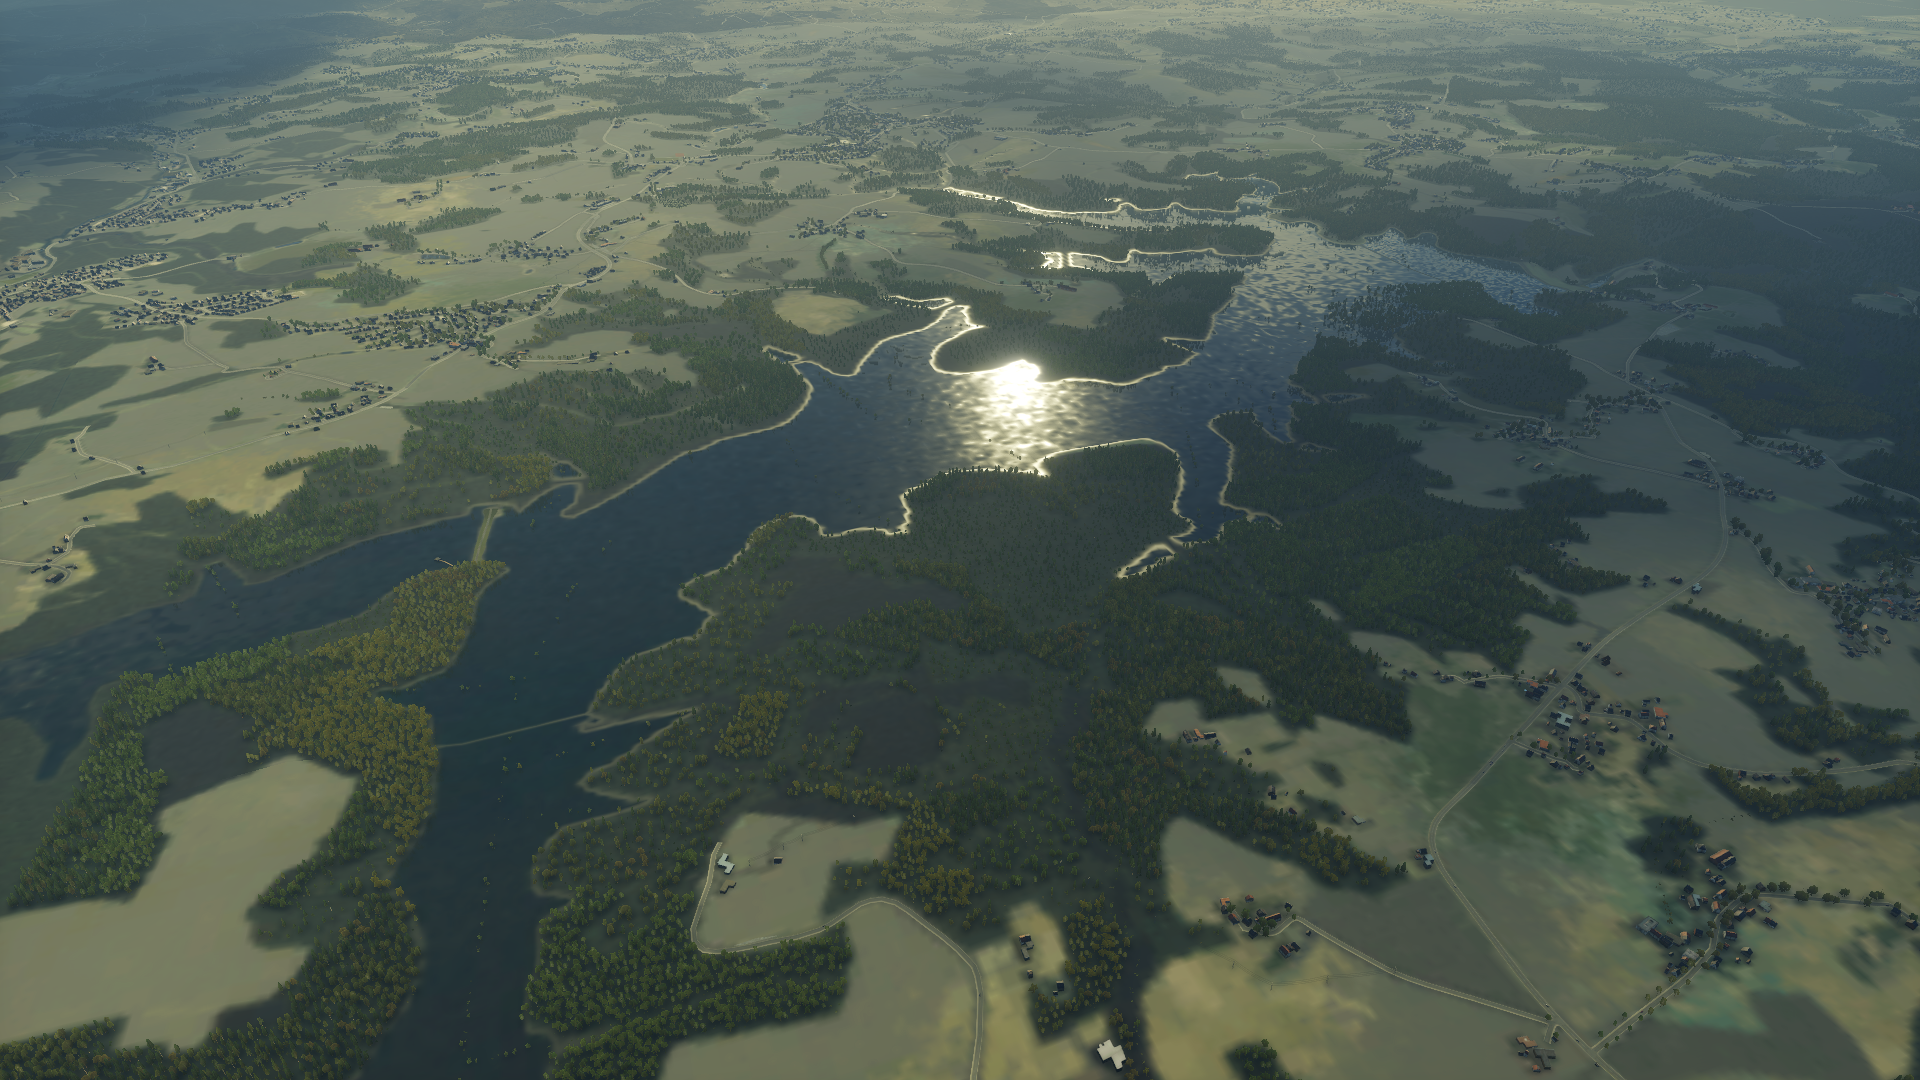
Comparison
At present, this is what Orthographic is capable of producing.
Left: Orthographic Right: Real World


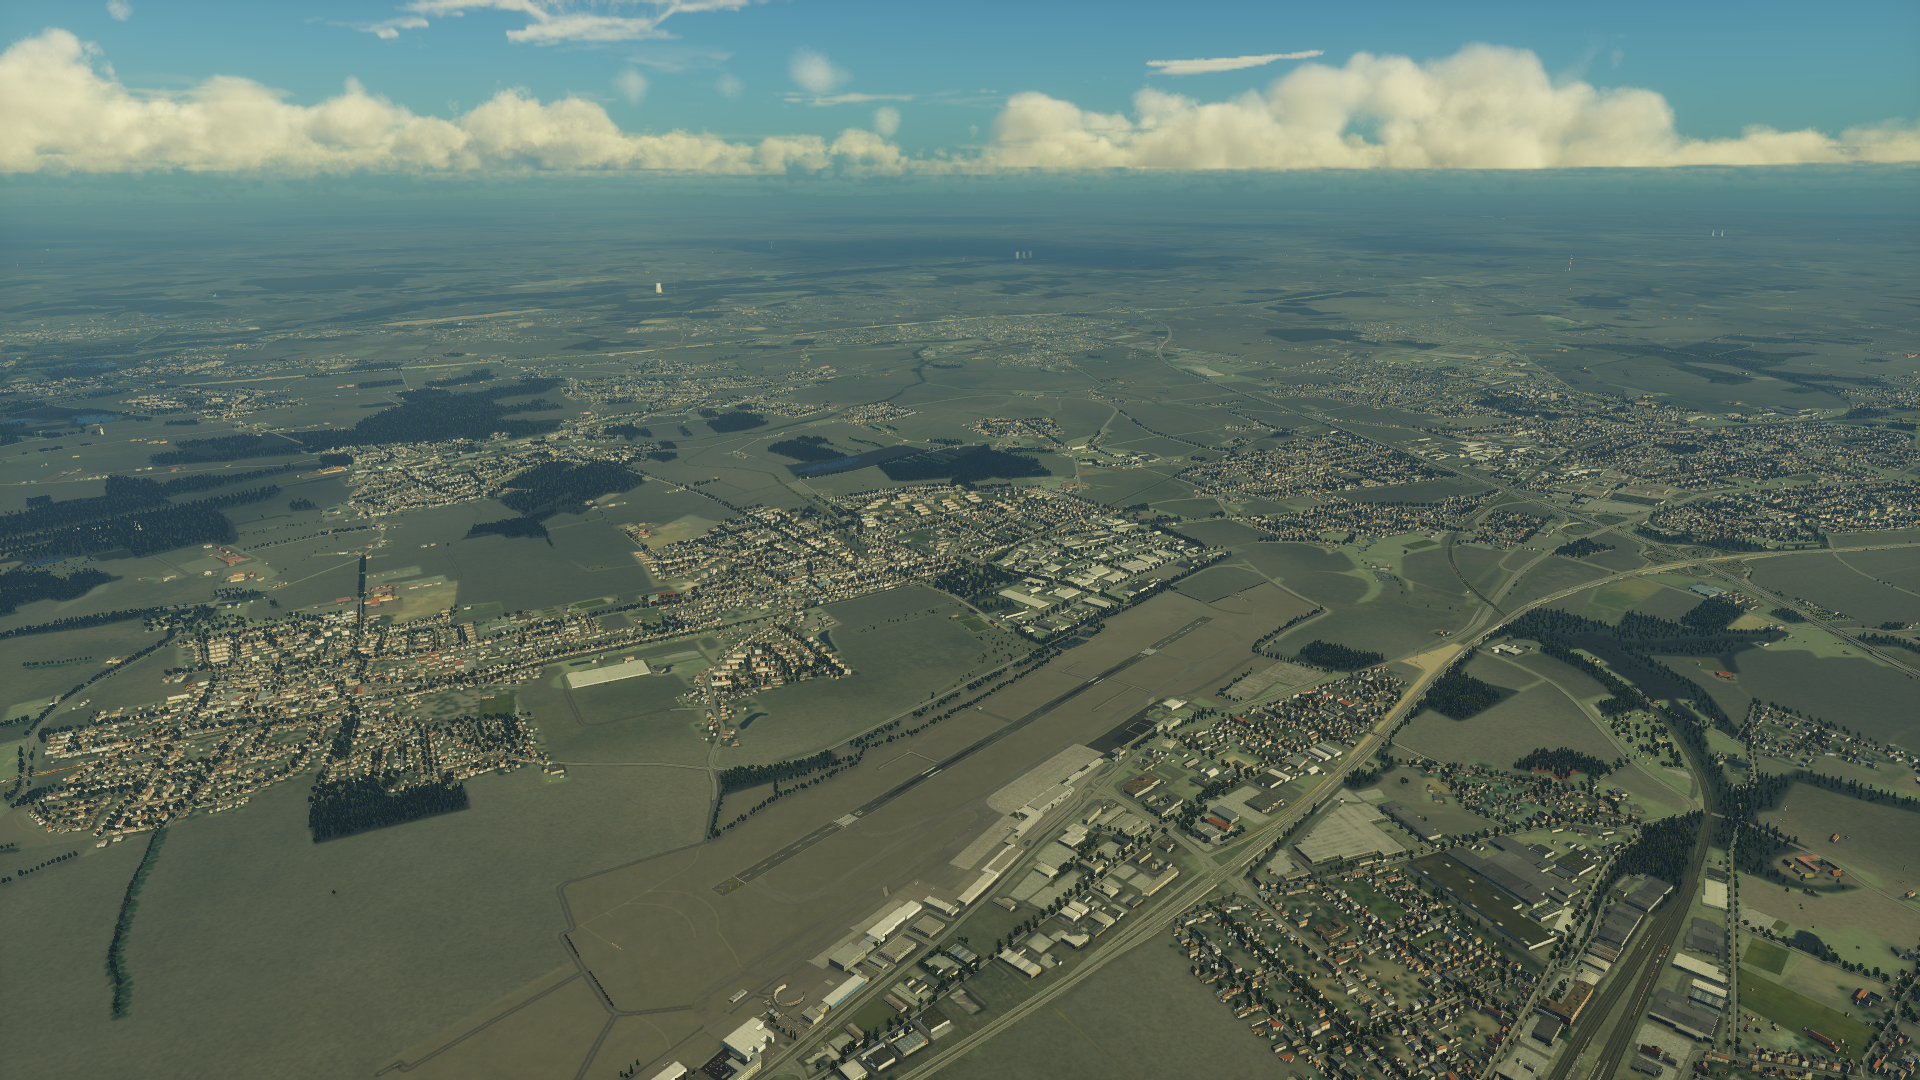
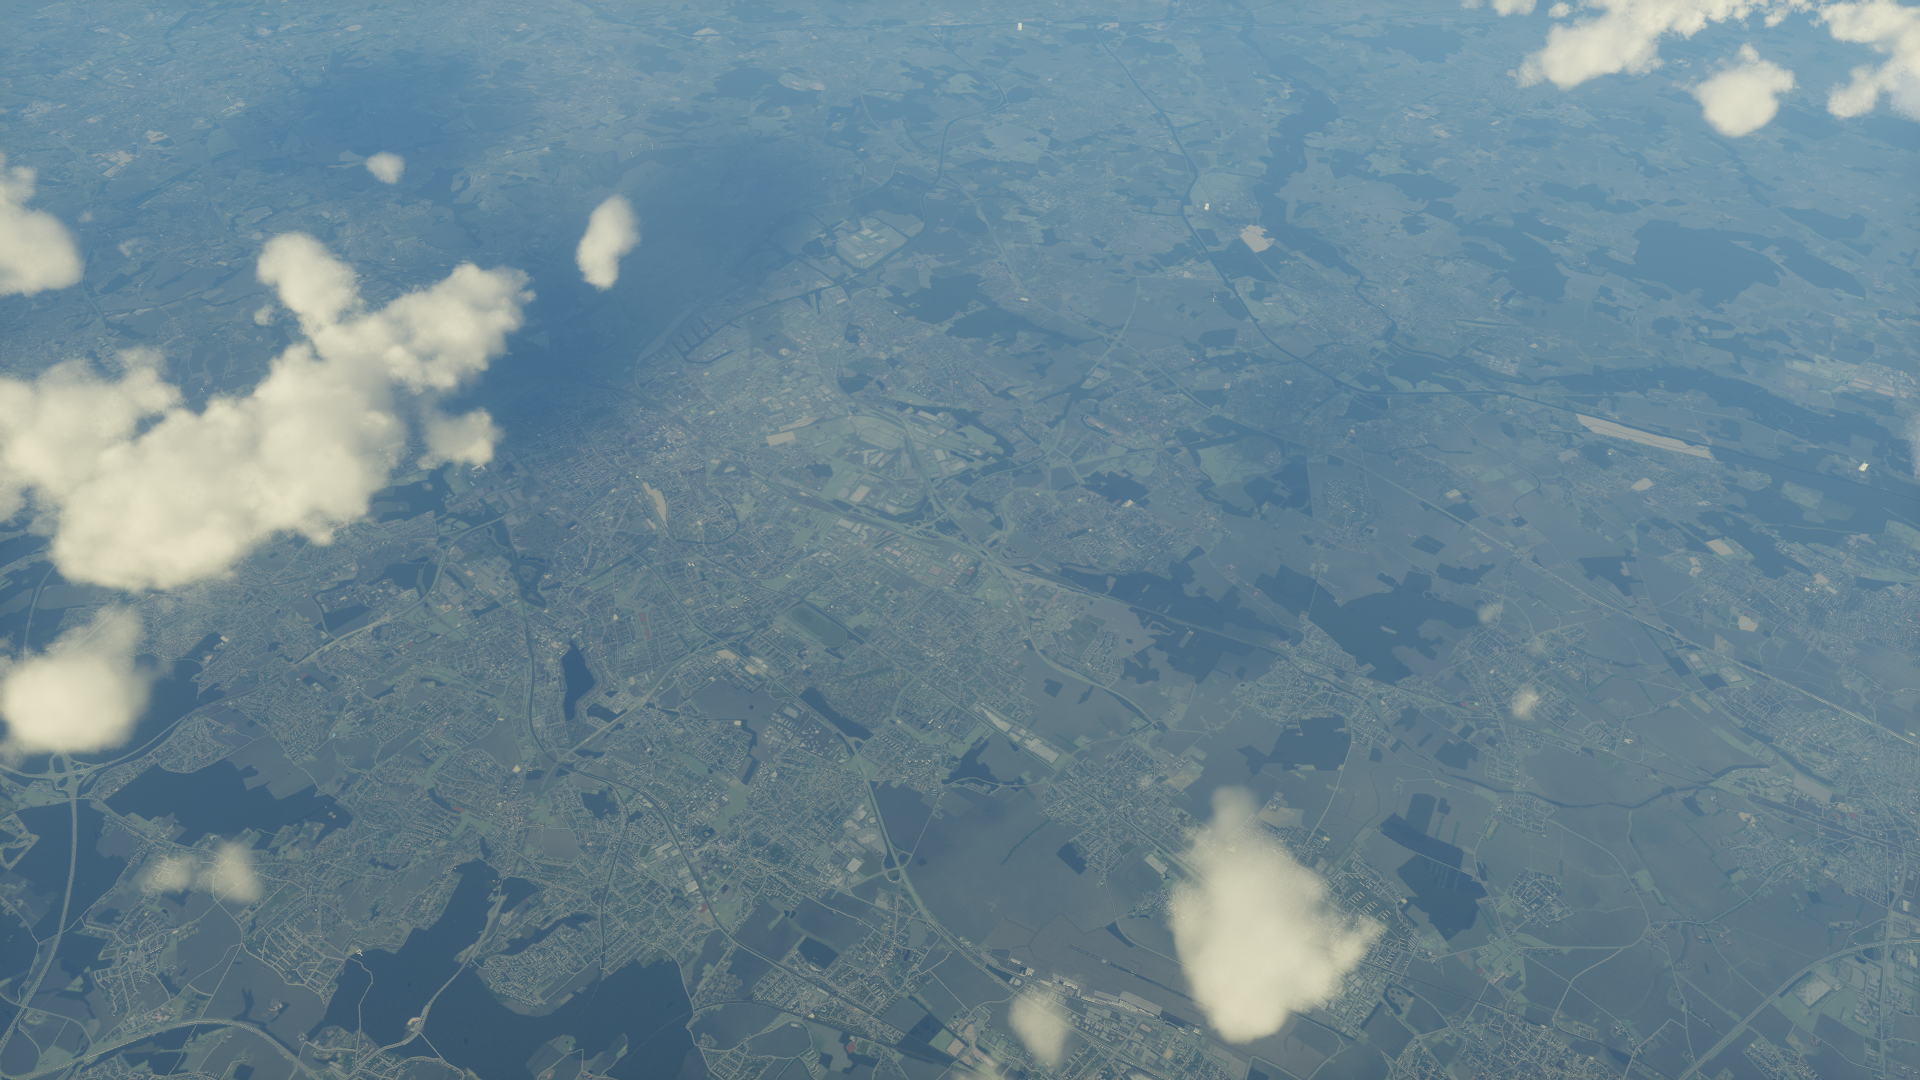
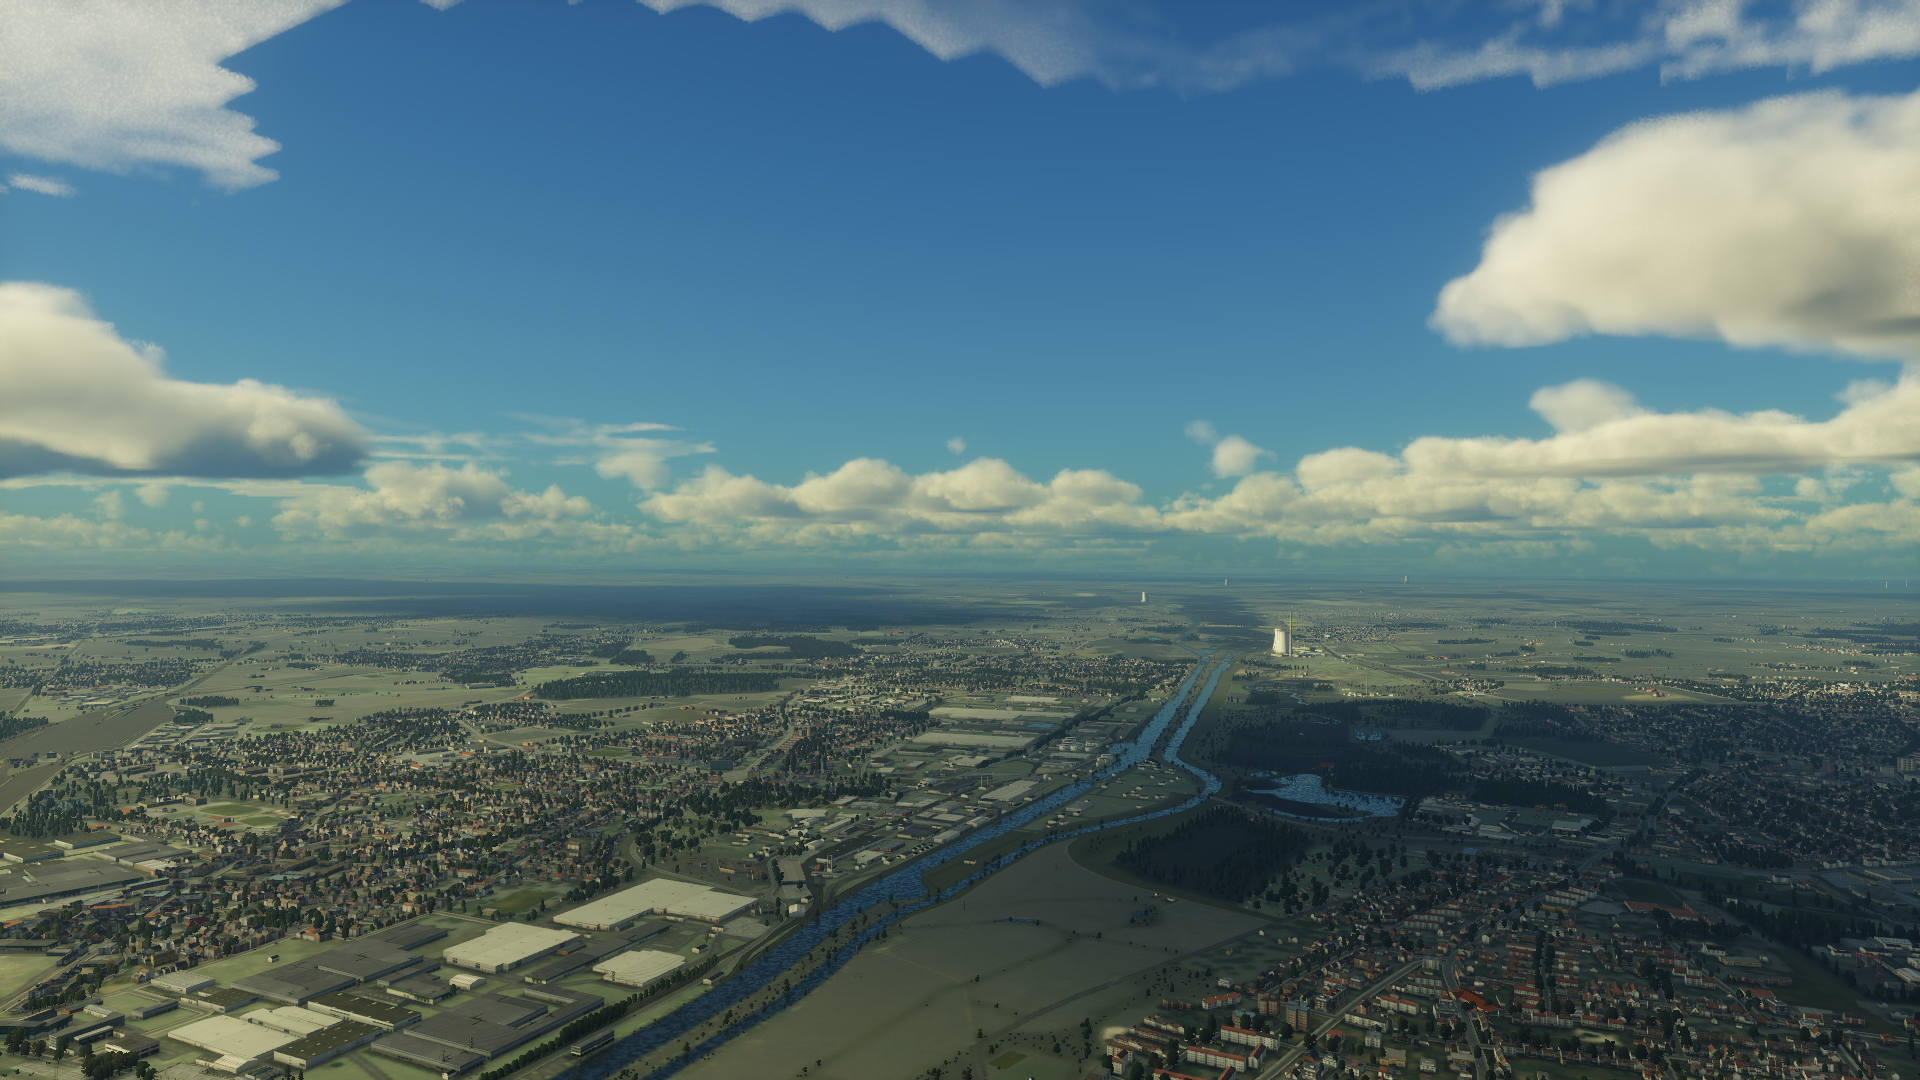
Simulator screenshots (X-Plane 12)
Wait, just what are orthophotos?
Aerial photos taken with a satellite, of varying resolution, altitude, and detail. When you switch to satellite in Google or Bing Maps - what you see is a collage of ortho photos, depending on how close or far away you are zoomed in.
What it is
As outlined, it is a tool that can generate, or rather - approximate, photo-realistic ortho photos. It does so by using a number of sophisticated mechanisms to generate these. These photos are then used as textures for the specific area the photo is made for - specifically a latitude and longitude coordinate.
What it is not
It is obviously not a full replacement for the real thing - satellites show how the world really is. Orthographic can only approximate the looks, and it tries to do this as best as it can using the data it knows about the specific latitude and longitude... but do not expect a complete 1:1 match of the real world with fixed coloration. It is also not meant to compete with mapping services or tools - it is merely a collection of scripts working together to offer a close approximation of how a satellite photo would look like - or in the very least, what you can expect to find in a satellite photo.
How does this work?
It boils down into these steps:
- Evaluate OSM data for the tile (I'll have these prepared for you, they are a separate download)
- Construct masks from that data, for a number of layers, from top to bottom
- Covert each mask layer to a photo-realistic layer
- Merge (blend) all layers from bottom to top
Orthographic creates zoom level 16 tiles for everything it encounters. N ormal maps are implemented, but only for water bodies. They did have a detrimental effect on the other features of a texture.
The final tile images are stored in DDS format with standard DCX-1 compression, which should be usable by X-Plane and Microsoft Flight Simulator.
I will provide a deep-dive into the tool soon. There will be a whitepaper about the software, as well as technical videos.
Important things to note
Orthographic does its very best to approximate good-looking ortho photos, as if they were taken by a satellite. However it is what it is: an approximation - it cannot replace or even get close to the actual, real world. I have tried my very best to bring in some variety, and make it so that every part generated does not repeat or look the same - like it is the case with other ortho packages I have tried, apart from Ortho4XP / AutoOrtho.
It is, at the end of the day, for a flight simulator. I believe Orthographic can strike the right balance between accuracy of the part of the world you fly in, and acceptable yet somewhat realistic looks.
Prior to publishing, there have been many iterations and hours of testing the generation of buildings. While the current state is far from perfect, it is as best I can make it - and I think we can agree that it looks good enough... for flight simulators. With the right tools in place, buildings will most likely be placed on many of these locations anyways.
Also, prior to publishing, there has been extensive testing of the code that generates the normal maps to make water as best looking as possible. And trust me, this has been an interesting challenge (to say the least).
Where it excels
It does a really good job at generating good-looking photo tiles, and knows how to correct Mercator distortion to render these tiles.
It also does a good job at making sure the tiles are seamless, and knows where a tile needs to be seamless, while at the same time, it also knows when it can pick something and be creative.
During development it also learned how to make a few things look more realistic - namely (hopefully good enough, or believable) shadows for certain elements.
Where it falls short
Of course, an algorithm of this magnitude can only go so far. Also, this is a one-man project - this means I do not have the monetary resources to make this the ultimate ortho photo solution that works without a satellite, neither am I able to afford humongous server farms with GPUs, running a clustered AI to generate these images.
In other words, it fails to generate parts of the world where there is no OSM data available. At this time, Orthographic gets creative to fill in the gaps. In some cases, due to API limitations of OSM, some data is missing or simply too large to place it in files I can work with. You may encounter incorrect river renders from time to time. However, by switching to zoom level 16 I have been able to eliminate a lot of these OSM data related issues.
Buildings are a challenge still - but in time the code for buildings has grown to the way it is now, and I think when blended with actual 3D geometry, the generated orthos really shine (provided the 3D geometry for buildings used the same OSM data than I did).
Apart from that I am aware that the code is most likely not the best and can be optimized. It is my first bigger Python project I dare publishing.
And where it hits the middle ground
Ultimately, I began the project in attempt to search for an answer to the question of how to eliminate issues in actual satellite imagery. It has become a journey more than anything else, and the result is solid enough to represent a viable alternative to actual satellite imagery in flight simulators. The produced images are reasonable enough to be perfectly believable when in the air with any plane - see my screenshots below.
It strikes the right balance between not using any generic scenery, while still wanting to use relatively realistic ground textures that are free of real-world issues and perspective distortions.
Requirements
- Current Python version (3.10 and up)
- Python modules:
Pillow (formerly PIL)
requests
numpy
perlin_numpy
colorama
IMPORTANT NOTE: Make sure that Pillow is at least version 11.0. If you have it installed already, you can check the version by doing a
pip list
in either your normal installation or your virtual environment (venv) and check the output. For proper functionality, the result should show like this:
./pip list
Package            Version
------------------ ---------
[...]
pillow             11.0.0
[...]
It is my strong recommendation to create a venv for an Orthographic-specialised Python environment. This way you can generate the orthos, while retaining your productive Python environment.
Additionally required
You will need to download the texture archive, which I am providing in a separate download. While the textures are an integral part of the project, adding them to the Git project usually caused severe slowdowns when working with my commits. I therefore decided to provide them separately.
The tree needs to look like:
orthographic/
    textures/
        amenity/
        barrier/
        boundary/
        building/
        [...]
In addition, you will need to download the appropriate OSM data archive and place it into the correct data folder to generate a tile. Once extracted, the XML files will have to be moved into the folder where Orthographic needs them. This is:
orthographic / z_orthographic / data / LAT-LNG-FOLDER / osm /
You can find all OSM files here: OSM data archive
Configuration
Open the file defines.py .
You will find various configuration options, each of which is documented what it does.
Also in defines.py, you will find the single layers, along with their corresponding mask blurring values. It is my strong recommendation NOT to change these values, as I have taken a lot of time to fine-tune those.
The most important line is high atop: mstr_datafolder
You need to adjust this line according to where the Orthographic source code is located, followed with a trailing "/" (slash) at the end. Fialing to adjust this will cause a huge array of errors.
Most of the switches are commented.
For X-Plane scenery, you will find the lines mstr_xp_ddstool and mstr_xp_dsftool. If you intend to generate X-Plane scenery, you will need to adjust the absolute paths to these tools. They need not be in the Orthographic folder, and can sit anywhere on your computer.
The option mstr_airport_radius has no effect at this time - but will have in the near future.
Do not adjust the values starting with mstr_zl_.
mstr_ortho_layers not only contains the tags to be considered, they are also in their correct order. I do not recommend to alter this content. In the near future the list may be expanded upon, and the order may change as well.
Running!
I tried my very best to make the process of generating the orthos/textures as easy and smooth as possible. At present, once you meet all the Python requirements, you only need to run one command - and all textures will be created in one go.
Generate orthos
- Download the appropriate OSM datapack from my repository
- Extract the zip file and extract it to:
[orthographic root] / z_orthographic / data / LAT-LNG-FOLDER ² / osm - Open a command prompt / PowerShell / Terminal and type the command:
python /path/to/orthographic/og.py LAT_NUMBER LNG_NUMBER AMOUNT_THREADS
Replace LAT_NUMBER and LNG_NUMBER with the desired latitude and longitude, followed by the amount of simultaneous threads to run for ortho generation. For example:
python /path/to/orthographic/og.py 51 7 16
This will generate 16 "orthos" at once. Which number you can use highly depends on the performance of your hardware, although I do not recommend to go higher than 16.
Depending on the machine you run this on, this may take a considerable amount of time. The latest development machine is a AMD Ryzen 9 7900X 12-Core Processor at the speed of 4.7Ghz - for latitude 51 longitude 7 I needed about 9 hours with 16 ortho generation threads, to produce 400 images at ZL16 (plus time to generate the Perlin noise maps).
I don't want to wait for nine hours for my tile?
Generating a tile takes time, and of course, electricity. Over time I will be able to offer pre-rendered tiles for various areas of the world, which you can purchase for a small but fair amount directly on marstr.online/orthographic. After purchase, you can immediately download the tile (or tiles if it is an entire country) and place it into X-Plane for immediate use (and skip everything needed to render a tile).
When water rendering goes wrong
After rendering completes, I highly recommend to look at the produced results. Due to the nature of OSM data, it is possible a water body or river is rendered incorrectly, and may cover a significant part of a texture.
In this case do the following:
- Delete the affected texture from the
orthosfolder - If you chose to generate normal maps, delete the corresponding normal map from the
normalsfolder - Navigate to the
datafolder of the tile you generated (for exampledata/+51+007) - If not present, create a folder named
water - Go into the
waterfolder - Create an empty file with the name of the affected texture - latitude-grid_longitude-grid (for example
4_1) - Do not fill the file with any content
- Have Orthographic re-generate the tile by simply issuing the command as stated above, except with just 1 thread
- It will be detected that an ortho is missing and will generate it - this time with fixed water rendering
If there are multiple tiles affected, delete the affected orthos and normals, and generate the empty files accordingly.
² Replace LAT-LNG-FOLDER with the actual latitude and longitude, for example +51+007
Generating a different tile
It is good practise to keep the z_orthographic folder inside the root of Orthographic, if you intend to add more tiles.
If you generate another tile, the data will be in the same folder. In other words, Orthographic is designed to keep everything in one single folder. This makes it also easier for X-Plane.
As the strain on my server became too much with the XML generation, for I am bulk-generating the OSM data and place them on my server for download. Check the downloads section of marstr.online/orthographic if the OSM data for the tile you intend to generate is present.
Generate X-Plane scenery
Once the process to generate the orthos has completed, you will need to run a second command, if you want to generate scenery for the X-Plane flight simulator. If you enabled generation for X-Plane in the defines.py file, the textures will already be stored in the proper .dds file format.
Requirements
You will need to either download the proper height data file from one of the many available websites, such as viewfinderpanoramas, or download the entire pack from my repository, and extract the file at a convenient location.
Find the correct file for your latitude and longitude. For example latitude 51 longitude 7 is N51E007.hgt .
Copy the file into
[orthographic root] / z_orthographic / data / LAT-LNG-FOLDER ²
Download the X-Plane command line tools from developer.x-plane.com and place them into a convenient location.
In the defines.py file, you will need to define the absolute path to the DDS tool and DSF tool. The DDS tool will already be necessary if you want the orthos to be converted at generation time.
Generating the scenery
Once you have completed this preparation, you can open a Command Prompt / PowerShell / Terminal and run
python /path/to/orthographic/og.py LAT_NUMBER LNG_NUMBER xpscenery
Replace LAT_NUMBER and LNG_NUMBER with the desired latitude and longitude followed by xpscenery to trigger the generation. For example:
python /path/to/orthographic/og.py 51 7 xpscenery
Once this process completes you should have a proper .dsf file in the "Earth nav folder" within the z_orthographic folder.
² Replace LAT-LNG-FOLDER with the actual latitude and longitude, for example +51+007
Installing / using the scenery
Copy the z_orthographic folder to your Custom Scenery folder inside your X-Plane installation.
You may delete the data folder when copying / moving the scenery to the X-Plane Custom Scenery content. This folder takes up considerable space, but is not needed for X-Plane itself.
Additionally, as it is standard procedure, you will need to edit your scenery_packs.ini file so that the scenery from Orthographic will be loaded into the simulator.
As Orthographic only provides orthophotos for a tile, the z_orthographic should appear at the very end of your list.
This is my current file as an example:
I
1000 Version
SCENERY

SCENERY_PACK *GLOBAL_AIRPORTS*
SCENERY_PACK Custom Scenery/simHeaven_X-World_Vegetation_Library/
SCENERY_PACK Custom Scenery/simHeaven_X-World_Europe-1-vfr/
SCENERY_PACK Custom Scenery/simHeaven_X-World_Europe-2-regions/
SCENERY_PACK Custom Scenery/simHeaven_X-World_Europe-3-details/
SCENERY_PACK Custom Scenery/simHeaven_X-World_Europe-4-extras/
SCENERY_PACK Custom Scenery/simHeaven_X-World_Europe-5-footprints/
SCENERY_PACK Custom Scenery/simHeaven_X-World_Europe-6-scenery/
SCENERY_PACK Custom Scenery/simHeaven_X-World_Europe-7-forests/
SCENERY_PACK Custom Scenery/simHeaven_X-World_Europe-8-network/
SCENERY_PACK Custom Scenery/z_orthographic/
Note the z_orthographic folder appearing at the end.
Concluding notes on scenery for X-Plane
I like to emphasize again that Orthographic only generates ground textures of a specified tile of latitude and longitude. It does not come with buildings or other geometry!. If you want 3D-scenery along with the orthophotos, you will need to acquire something like SFD Global or simHeaven. Using both in combination yields impressive results.
Improving the code
As I have hosted this on my private but publicly accessible git repository, it should be clear that I am making the code available to everyone. Of course, you are free to improve (I am sure the code needs some optimisation). If you changed or improved something, and you publish it (no matter where), you MUST adhere to the license this software ships with, which is OSL 3.0.
As it is hosted on my private Gitea, and not in a public instance like GitHub, I need to be very careful and clear about this. In short it means, also legally, that you cannot download the current snapshot, post the content somewhere else, and claim you made it. Respect the time, work and energy I have invested into this project :) .
If you have made notable improvements to the code (for example a trained AI model for ground imagery, you found and fixed critical bugs, or found a way to improve the final result of the textures), you can email me at marcus [at] marstr [dot] online, and send in what you changed. I will have a look at your improvement, test it thoroughly, and if all is good I will push the changes with you as the author into my repo.
Let me join your Discord
I don't have one.
Let me see your Twitter on this tool
Don't have one either.
OK... TikTok?
No.
Surely you have at least Insta.
Nope.
Man. Youtube?
Yes. But only for explainer and demo videos on the software: